Everyone wants to be the hero and claim that he or she picked the very top or bottom of a currency pair. However, aside from bragging rights, is there really anything that pleasant about repeatedly selling at every new high in the hope that this one will finally be the top?
One of the biggest pitfalls encountered by novice traders is arbitrarily picking a top or bottom with no indicator support. The pure fade trade is an intraday strategy that picks a top or bottom based on a clear recovery following an extreme move. Here we'll cover this strategy and show you how you can put it to use.
Overview
The strategy looks for an intraday reversal by using a combination of three sets of Bollinger bands and the relative strength index (RSI) on hourly charts. The trade sets up when the RSI hits either an overbought or oversold level. Overbought is defined as an RSI above 70, while oversold is defined as an RSI below 30. This signals that we can start looking for a possible reversal.
However, rather than just immediately buying in the top of a trend reversal based solely upon RSI, we add in three sets of Bollinger bands to help us identify the point of exhaustion. The reason we use three sets of Bollinger bands is because it helps us to gauge the extremity of the move along with the extent of the possible recovery.
Created in the 1980s by John Bollinger, the Bollinger bands strategy was originally based on two standard deviations (SD) above and below the 20-day moving average. The theory was then to buy or sell when the prices hit the Bollinger band because using two standard deviations ensures that 95% of the price action will fall between the two bands.
In our strategy, we add on a third standard deviation Bollinger band. When prices hit the third band on any side, we know that the move is within the 5% minority, which characterizes the move as "extreme". When we move away from the third standard deviation Bollinger band and into the zone between the first and second standard deviation Bollinger bands, we know that the currency pair has hit its extreme point at the moment and is moving into reversal phase. Finally, one last thing that we look for is for at least one candle to close fully between the second and first standard deviation bands. This last rule helps to screen out fake moves and ensures that the previous move is really an exhaustion. This is a low-risk, low-return trade for those who simply want to scalp the market for small profits. Only hourly charts are recommended for the strategy.
Rules for a Long Trade
- Look for the relative strength index to be lower than 30.
- Watch for the price to hit the three standard deviation Bollinger band (SD BB).
- Wait for the candle to move from the 3SD-2SD BB zone into the 2SD-1SD BB zone on hourly charts.
- After one candle closes fully within the 2SD-1SD BB zone, buy at market.
- Place a stop at swing low minus 10 pips.
- The first target for half of the position is the amount risked; move the stop to breakeven.
- The second target is the tag of the second SD BB on the topside.
- Look for the relative strength index to be greater than 70.
- Watch for the price to hit the three standard deviation Bollinger band (SD BB).
- Wait for the candle to move from the 3SD-2SD BB zone into the 2SD-1SD BB zone on hourly charts.
- After one candle closes fully within the 2SD-1SD BB zone, sell at market price.
- Place stop at swing high plus 10 pips.
- The first target for half of the position is the amount risked; move the stop to breakeven.
- The second target is the tag of the second SD BB on the downside.
Let's explore some examples:
The first example is the EUR/USD from February 22, 2006 (Figure 1). The currency pair started breaking down shortly after the
We watched closely for a full close within the second and first standard deviation Bollinger bands, at which time we bought at market. Our trade was triggered at 9am EST, and we entered into a long position at 1.1884. We immediately placed our stop at the swing low of 1.1862, risking 22 pips on the trade.
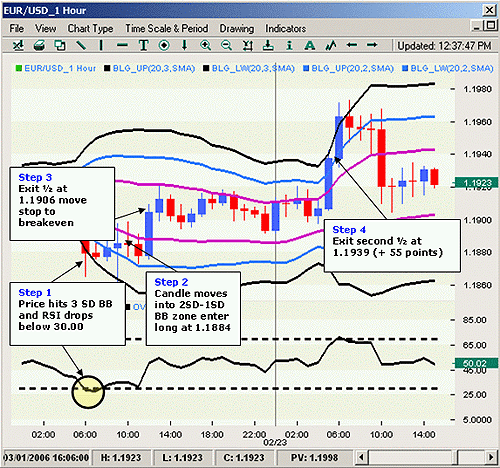 |
| Figure 1: Pure Fade, EUR/US |
| Source: FXtrek Intellichart |
Because our first take-profit is the amount that we risked, we put in an order to sell half of the position at 1.1906. The order gets triggered four hours later at 1pm EST. We move our stop to breakeven and get ready to sell the second half when the price hits the second standard deviation Bollinger band on the topside. The remainder of the position is eventually closed out at 1.1939 for a total trade profit of 55 pips.
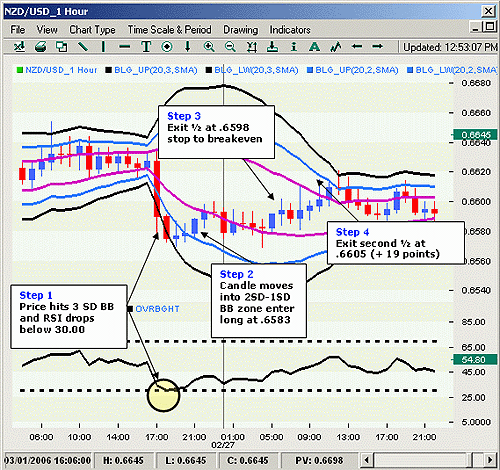 |
| Figure 2: Pure Fade, NZD/USD |
| Source: FXtrek Intellichart |
The next example is the NZD/USD on February 26, 2006. Like the EUR/USD in the previous example, the currency pair range traded down going into the open of the Asian markets, when
We then watched carefully for a full bar close between the second and first standard deviation Bollinger bands. This happened at 9pm EST, at which time we went long at the open of the next bar, or at 0.6583. We placed our stop at the swing low of 0.6568, risking a total of 15 pips on the trade. The risk is very small, which puts our profit at a very achievable 0.6598. This level is reached at 8am EST the next day, at which time we move our stop to breakeven and target the second deviation Bollinger band on the top side for the remainder of our position. The band is hit and we exit at 0.6605, for a total trade profit of 18.5 pips.
Short Side
On the short side, we look at an example in USD/JPY from March 10, 2006. Going into the open of the
Our stop is the swing high of 119.13, putting our risk at a tiny 10 pips. Our first target was 118.93, which was triggered at 3pm EST. Once our target was hit, we moved our stop on the remainder of the position to breakeven and looked to take profit once we hit the second Bollinger band on the downside.
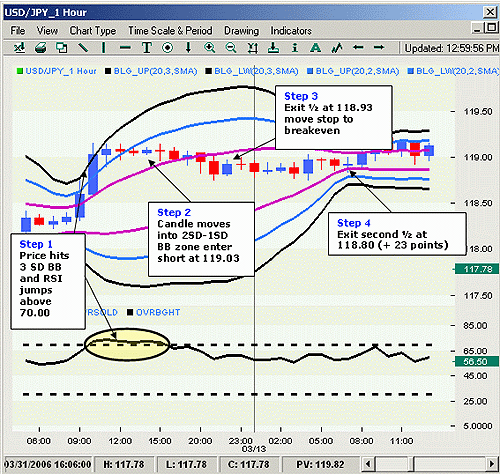 |
| Figure 3: Pure Fade, USD/JPY |
| Source: FXtrek Intellichart |
At 4am EST the following day, we exited the remainder of our position at 118.80 for a total trade profit of 16.5 pips, before the position reversed course and started rallying once again. As you can see, the pure fade trade takes small profits quickly in times of trend exhaustion; however, more often than not, the trend continues course after prices hit the second Bollinger band in the opposite direction.
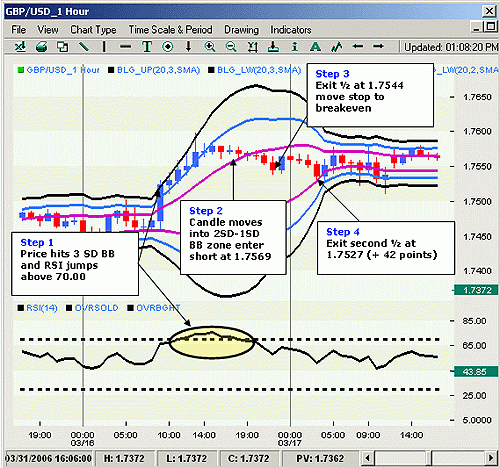 |
| Figure 4: Pure Fade, GBP/US |
| Source: FXtrek Intellichart |
The GBP/USD chart above is another good example of a short fade trade. On March 16, 2006, we watched the GBP/USD trade in a tight range going into the release of February
The currency pair hit our radar screen at noon EST when RSI broke above 70. We checked to see that the price was also tagging the third standard deviation Bollinger band on the top side, and we began to look for an opportunity to go short the GBP/USD when we saw a full bar close below the third and second standard deviation Bollinger band zone. This occurred at 4pm EST at which time we went short at the open of the following bar, or 1.7569.
We placed our stop at the swing high of 1.7594, risking 25 pips. The target for the first half of our position is the entry minus the amount that we risked, or 1.7544. After we entered into our position, the GBP/USD began to gradually sell off, triggering our take-profit order at 10pm EST. We then looked to exit the remainder of the position when the price hit the first standard deviation Bollinger band on the opposite side. This occurred the following day, giving us an exit of 1.7527 and earning us a total of 33.5 pips on the entire trade.
At this point, some traders looking at the charts may say, "Oh wow, the second half was triggered at 3am EST. I'm asleep!" It is very likely that you will not be able to spend the entire wee hours with your eyes glued to the computer screen, so for those who just want a target to place the second take-profit order, two times risk would be a good level. In this case, we could have placed our second exit order at 1.7519.
When It Failed
Of course, no one strategy can be accurate 100% of the time, so the last example is one where the trade did not end up in a profit. The GBP/JPY chart above is from February 14, 2006. At 7pm EST, or at the Asian market open, GBP/JPY began to break out of its post-U.S./pre-Asian price consolidation. RSI breached the 30 oversold mark, and the price hit the third standard deviation Bollinger band, which put the currency on our radar screen, where we looked for an opportunity to go long.
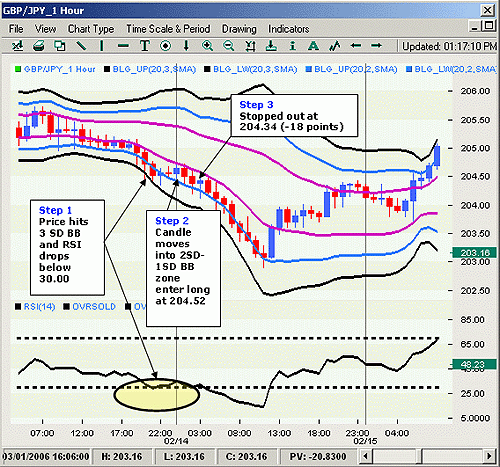 |
| Figure 5: Pure Fade, GBP/JPY |
| Source: FXtrek Intellichart |
We waited until four hours later and saw a candle open and close fully within the first and second standard deviation Bollinger bands, so we looked to buy at the open of the next candle. Our entry price is 204.52. We put our stop at the swing low, or 204.34, risking a total of 18 pips. Following our rules of taking profit on the first half of our position by the amount risked, we put an entry order to sell half at 204.70. GBP/JPY, however, was unable to sustain its momentary relief rally and proceeded to extend its weakness. We were stopped out at 204.34, two hours later, but because the risk was small, the loss would have had a minimal impact on most trading accounts.
Conclusion
Picking a top or bottom without indicator support is a recipe for failure. The pure fade trade is an intraday strategy that picks a top or bottom based on a clear recovery following an extreme move. It isn't foolproof, but if applied correctly, it can be a profitable strategy for forex traders.


No comments:
Post a Comment